

SwiftUI Essentials: The Big Nerd Ranch Course
SwiftUI TrainingWe’re thrilled to announce the newest course at Big Nerd Ranch – SwiftUI Essentials! Before we jump into what the course entails, here’s a...
Although the iOS 7 adoption rate is now at 85 percent, many developers still need to support iOS 6. I’ve seen people struggle with designing their interfaces so that they look at home on both versions of the operating system. This blog post will show you the best practices for achieving this goal.
The problem initially occurred when developers first updated their apps for iOS 7. Everything looks great on iOS 6, but when you run the app on iOS 7, your subviews get cut off.
Here is an example from my iOS book that illustrates the situation in an application we call Homepwner:

You may have also come across a similar issue with UIScrollView; we’ll talk more about that shortly.
So the question is, how do you design your interfaces such that they look right on both iOS 6 and iOS 7? (Hint: if you aren’t already using Auto Layout, you’re going to want to start using it.)
We’re going to take a look at three different use cases:
interfaces that do not have a UIScrollView
interfaces that do use UIScrollView (or a subclass thereof, such as UITableView or UIWebView)
interfaces that are built using storyboards
If you aren’t using a scroll view, adjusting the interface to work with both iOS 6 and iOS 7 is very easy.
Use Auto Layout.
Have a single view anchored to the top of your UI using a constraint [1. It doesn’t have to be a single view, but you’ll need to duplicate the remaining steps for each additional view that is anchored to the top.], with all other views anchored either directly or indirectly to that view.
Create an IBOutlet to that top NSLayoutConstraint.
Modify this constraint in viewDidLoad conditionally based on the OS version that the app is running on.
Let’s take a look at each of these steps.
I mentioned earlier that you should be using Auto Layout—and really, you should be using it for all of your interfaces. If you are not, you are doing yourself a huge disservice. Maybe this’ll be the subject of a future blog post, but for now, send me any “why?” questions by tweeting @cbkeur. I hope I don’t have to convince you.
Typically, you’ll have a subview at the top of your interface. I often refer to this view as the anchoring view (if you have a better name for this, please let me know). This subview will be constrained to the top of its superview via a top constraint, and the rest of the subviews will be laid out in some fashion relative to that top view.
Take a look at this screen shot (designed with iOS 7 in mind, unlike the previous screen shot).
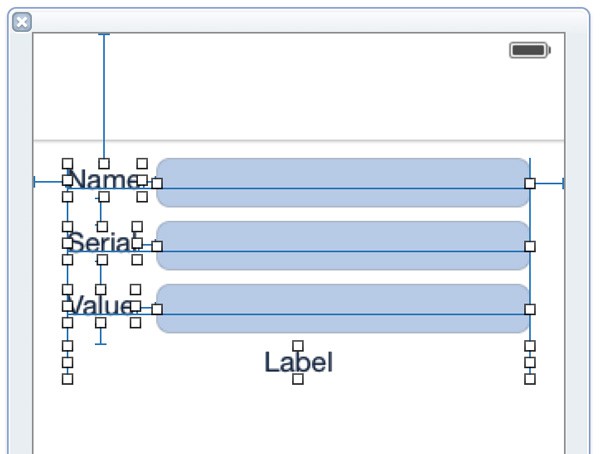
In this example, I’m considering the name label the anchor view. The text field to its right has aligned its baseline with the name label to determine its y-position. As you can see, there is exactly one view that is anchored to the top. This makes updating our interface very easy, and will make fixing our interface for iOS 6 a breeze.
In iOS 6, there is going to be quite a bit of white space above the name label. This is because the top of the view is at the bottom of the navigation bar, as opposed to the top of the screen, like you can see in the Interface Builder screen shot above. To eliminate that white space, we just need to subtract the heights of both the status and navigation bars from the top constraint’s constant.
To do this, we first need to create an outlet to this constraint in code so we can modify it at run time. This looks like:
@property (nonatomic, weak) IBOutlet NSLayoutConstraint *topConstraint;
Make sure to connect this to the NSLayoutConstraint that you have in your XIB file. (If you are doing things programmatically, then you already have a reference to that constraint, so you’re good to go.)
The last thing you need to do is actually update the constraint’s constant based on the OS version. viewDidLoad is the perfect time for this if you are using a XIB (as that is the first time your outlet is actually connected), or loadView if you are building your interface programmatically.
    - (void)viewDidLoad
    {
        [super viewDidLoad];
        // Check to see if we are running on iOS 6
        if (![self respondsToSelector:@selector(topLayoutGuide)]) {
            self.topConstraint.constant = self.topConstraint.constant - 64;
        }
    }
Let’s walk through this code. The code above uses the topLayoutGuide property of view controllers to determine if you are running on iOS 6 or iOS 7, as it is an iOS 7-only property. This property is closely related to laying out interfaces, so you use this as a reference point. If the view controller does not respond to that selector, you are on iOS 6, so you need to remove the white space that our XIB had at the top. To do this, subtract the height of both the status and navigation bars [2. I hardcoded this value, 20 from the status bar and 44 from the navigation bar, but it might be better to do it dynamically, especially if you support iPhone landscape. Just add the height of the UIApplication’s statusBarFrame to the height of the navigation controller’s navigationBar.].
(If you built your interface for iOS 6, and needed to support iOS 7 after the fact, you’d want to add in the white space instead of removing it, so you’d want to do self.topConstraint.constant = self.topConstraint.constant + 64;. This would fix the problem in the screen shot at the top of this blog post.)
Use Auto Layout; it’ll make your life much easier.
Say you have a scroll view (or subclass), and for one reason or another, your interface is wonky in iOS 6 or iOS 7. What can you to do fix it?
Use UIViewController’s automaticallyAdjustsScrollViewInsets if you have a single scroll view that is at the “back” of your interface (I’ll define this below).
Adjust the contentInset and scrollIndicatorInsets properties of the scroll view manually if you have multiple scroll views, or if it’s not at the “back” of the interface.
Let’s take a look at both of these circumstances.
With iOS 7, UIViewControllers have a property called automaticallyAdjustsScrollViewInsets, and it defaults to YES. This property can make your life much easier, provided you understand how it works.
If you have a scroll view that is either the root view of your view controller (such as with a UITableViewController) or the subview at index 0, then that property will adjust both the contentInset and the scrollIndicatorInsets. This will allow your scroll view to start its content and scroll indicators below the navigation bar (if your view controller is in a navigation controller). As opposed to manually adjusting the frame of the scroll view to start underneath the navigation bar, this solution will allow your scroll view content to scroll underneath the navigation bar, which is an important aspect of iOS 7.
If your scroll view does not meet the prior criteria (or if you’ve set automaticallyAdjustsScrollViewInsets to NO), then you’ll need to manually update those two properties:
    - (void)viewDidLoad
    {
        [super viewDidLoad];
        if ([self respondsToSelector:@selector(automaticallyAdjustsScrollViewInsets)]) {
            // For insetting with a navigation bar
            UIEdgeInsets insets = UIEdgeInsetsMake(64, 0, 0, 0);
            self.tableView.contentInset = insets;
            self.tableView.scrollIndicatorInsets = insets;
        }
    }
You might want to do this if you have a background image behind your scroll view, or if you have multiple scroll views within one view controller. Since this property does not exist on iOS 6, you get the existing behavior.
Ah, storyboards. Apple loves storyboards and they can do stuff that is seemingly magic. So what do you do for storyboards?
Use Auto Layout.
If you aren’t using a scroll view, create a top constraint to the “Top Layout Guide”.
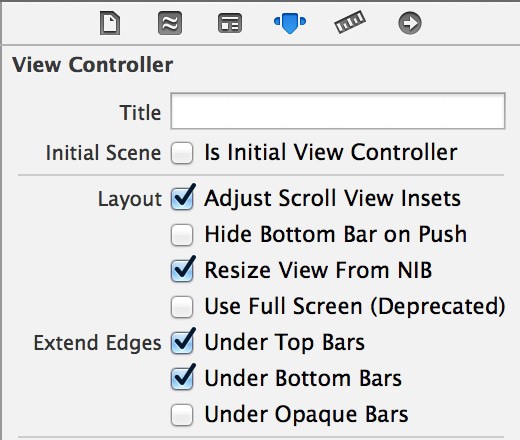
If you are using a scroll view, you can use the scroll view steps above (and you’re able to set the automaticallyAdjustsScrollViewInsets property from within the Attributes Inspector on the view controller).
Well that was easy. Let’s take a look at both of these.
Creating a constraint to the “Top Layout Guide” is easy, as shown in this screen shot.
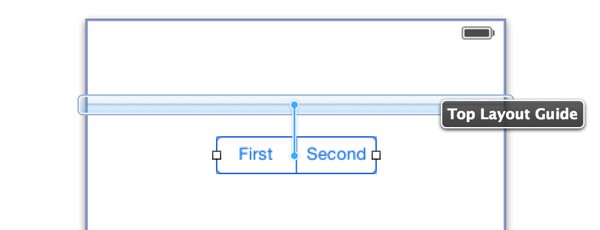
As long as everything is constrained relative to the top layout guide, then your interface will lay out correctly on iOS 6 and iOS 7.
“But wait, Christian,” you might say. “You said that the top layout guide is an iOS 7-only feature.” And you’d be entirely correct. Apple is working some magic here. On iOS 7, Apple is correctly adding a constraint to the topLayoutGuide, but on iOS 6, Apple is creating a UIView with a frame of {0, 0, 0, 0} and attaching that top constraint to that view instead. I wish it could work as nicely somehow with XIBs, but alas.
For scroll views, follow the same advice as in the previous section. If you need to set the automaticallyAdjustsScrollViewInsets property, you can do so from the Attributes Inspector on the view controller.
So why did Apple make these changes that can require a non-trivial amount of work on behalf of the developer?
One of the key areas that Apple wanted iOS 7 to improve upon was deference, which is defined by my Mac as “humble submission and respect.” Our interfaces should defer to the content, which is at the heart of the experiences within our apps. Apple’s Human Interface Guidelines state that “the UI helps users understand and interact with the content, but never competes with it.”
Take Safari for example:
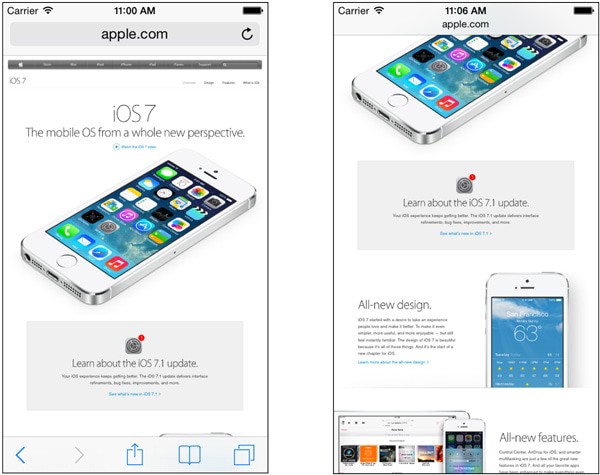
When you first visit a site, you have all of the controls at your disposal. The URL bar and reload button are at the top, and the toolbar at the bottom contains the rest of the buttons needed to interact with the app.
Once you begin to scroll, the UI defers to the content on the screen. The navigation bar at the top shrinks to display only the base URL, and the toolbar at the bottom goes away completely. If a user needs to access these buttons, they can simply tap on the navigation bar at the top, or scroll back up [3. The way iOS handles this is a little interesting. If you scroll to the very top of the page, the navigation controls reappear. If you flick to scroll up with some velocity, the controls will also appear. But if you scroll up without flicking, the controls stay hidden. My gut tells me this is because Apple decided in the latter case you were probably deliberately still reading the page, and thus didn’t want the controls to appear.].
Some classes were changed in pursuit of deference throughout iOS 7. We’ll focus on UINavigationController, but the same principles can then be applied to UITabBarController.
In iOS 6 and earlier, the content view of a navigation controller extended from just under the UINavigationBar to the bottom of the screen. With iOS 7, on the other hand, the content view extends from the very top of the screen to the very bottom, underlapping the navigation bar.
Take a look at this screen shot of Maps taken on both iOS 6 and iOS 7. Notice that with iOS 7, you can easily see the blurred content under the navigation bar (and the toolbar at the bottom).

Content is clearly king here. The translucent UI elements hint at the content behind them.
If you have an interface without a scroll view, use Auto Layout to shift your content up or down to support both iOS 6 and iOS 7.
If you are using a scroll view, take advantage of UIViewController’s automaticallyAdjustsScrollViewInsets property to due the heavy lifting for you. If, for some reason, you aren’t able to take advantage of that property, then you’ll want to adjust the contentInset and scrollIndicatorInsets properties of the scroll view to achieve a similar result.
If you are using storyboards, anchor views to the “Top Layout Guide”.
Today’s blog post comes courtesy of our iOS hero, Auto Layout. I’m a huge proponent of Auto Layout. With Xcode 5 (and even more so with Xcode 5.1), I find it quite easy to work with. You’ll probably see more from me on Auto Layout in the future.
We’re thrilled to announce the newest course at Big Nerd Ranch – SwiftUI Essentials! Before we jump into what the course entails, here’s a...

We've just released the 7th edition of iOS Programming: The Big Nerd Ranch Guide. And it's pretty crazy to write that! Seven editions since...

One of the most exciting announcements from WWDC this year was that native multitasking is coming to iPad. The ability to run two apps...