

Swift Regex Deep Dive
iOS MacOur introductory guide to Swift Regex. Learn regular expressions in Swift including RegexBuilder examples and strongly-typed captures.
Like nearly all of our iOS developers, I’ve been playing around with Swift. It’s too soon to say how it will be useful to me in my iOS development tasks, as it’s a bit too new to use in production apps. (A month following WWDC, Apple re-engineered how Arrays would work. Arrays!)
However, just prior to WWDC, I’d been playing around with UIDynamics, so it seemed logical enough that my first steps in Swift should be to try building on that knowledge. Turns out, UIDynamics in Swift is pretty much just like using it in Objective-C. We just need to drape it in the Swifty Goodness™ and it will work just like it’s expected to.
To demonstrate, let’s throw together a quick project. Using Xcode 6, create a new single-view project in Swift. I named mine “Rock Box.”

We won’t need to touch the Storyboard, so let’s go right to ViewController.swift and add the following code:
    var box : UIView?
    func addBox(location: CGRect) {
        let newBox = UIView(frame: location)
        newBox.backgroundColor = UIColor.redColor()
        view.insertSubview(newBox, atIndex: 0)
        box = newBox
    }
and we’ll add a line to viewDidLoad() to invoke it.
    override func viewDidLoad() {
        super.viewDidLoad()
        // Do any additional setup after loading the view, typically from a nib.
        addBox(CGRectMake(100, 100, 30, 30))
    }
When we run it, we see a red box:
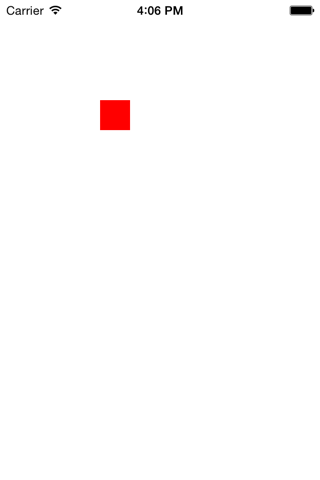
It doesn’t move; nothing moves. That’s more than a little boring. Let’s set this box in motion.
The ringleader of this circus is the UIDynamicAnimator. According to a given set of rules, the animator adjusts the location of each object each time the screen is redrawn. By itself, an animator doesn’t do anything at all; the rules it needs are called behaviors. Behaviors describe things like an impulse force, such as a push, or a persistent force like gravity. You can also specify things like friction, elasticity and so on with them. The animator doesn’t do any of that rule-making of its own; it’s just the ringleader. We’ll declare one in the next section.
Let’s start with a gravity behavior, so that our red box will fall to the bottom of the screen. It’s conceptually the simplest behavior to understand; a pull in a given direction adds velocity to the object with each tick of passing time. We are going to send our gravity straight down.
    var animator:UIDynamicAnimator? = nil;
    let gravity = UIGravityBehavior()
    func createAnimatorStuff() {
        animator = UIDynamicAnimator(referenceView:self.view);
        animator?.addBehavior(collider)
        gravity.addItem(box);
        gravity.gravityDirection = CGVectorMake(0, 0.8)
        animator?.addBehavior(gravity);
    }
It’s important to note that the question mark following UIDynamicAnimator means that the variable may be nil. In fact, right here I set it to nil. The reason is a bit nuanced:
animator is declared on the class, which means the assigment here will be executed when the view controller’s init is invoked.self.view must be called following init.self.view.Since we have a chicken-and-egg problem brewing here, we’ll allow this variable to be nil, and set it during viewDidLoad(). This introduces some wrinkles, as any time we access the animator variable, we will find ourselves having to ensure that the value is non-nil prior to using it. This is handled in Swift by following the reference to animator with a question mark, eg. animator?.behaviors(). We’ll discuss that more in a bit. For now, let’s add code to viewDidLoad to invoke our new method…
        addBox(CGRectMake(100, 100, 30, 30))
        createAnimatorStuff()
    }
… then compile it and run it. What does it look like? It looks like this:

Well, that was fun… for a second. It fell right off the bottom.
The UICollisionBehavior takes care of worrying whether objects in their trajectories will collide, and if so, how they should react. In addition to letting objects hit each other, it also understands boundaries, which are paths that act like the frame of an object. Declare (using let) a constant of UICollisionBehavior, and add it to the setup code:
        collider.addItem(box)
        // we're bouncin' off the walls
        collider.translatesReferenceBoundsIntoBoundary = true
        animator?.addBehavior(collider)
Run it, and what do we see?

Better! The box falls and stops on the “floor.” There’s even a bit of a bounce!
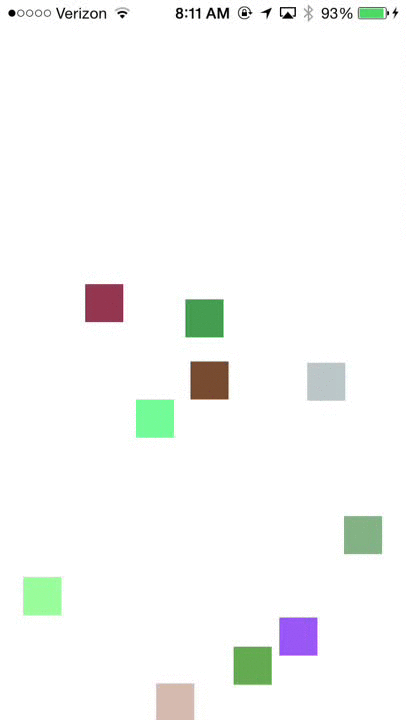
Let’s refactor a bit. I want to see more boxes. We’ll create a function to find a random frame that isn’t on top of a previously drawn box, and another for a random color. Once we have those things, we can draw ten boxes at random on the screen. In fact, there’s a lot to it, so just go read that commit to see all that was done. Of specific interest: We no longer add the boxes to behaviors when we call createAnimatorStuff(), but now add each box individually with a call to addBoxToBehaviors(box).
Now, we can see 10 boxes falling and interacting with each other!
But they still don’t do very much. Why don’t we tie our environment’s gravity to the gravity reading from the accelerometer?
The accelerometer in your iOS device can do a bunch of neat things, and one of the most common is to tell us in what direction gravity is pulling. Apple’s documentation on UIAcceleration opens with an image showing how these axes are translated to the device:

These axes correspond to the direction of gravity… mostly. I have found that the Y axis appears to be flipped. As such, when I translate the CMAcceleration values to a CGVector, I’ll need to transform that value.
Creating a CMMotionManager gains us access to the accelerometer data. We could query the accelerometer data ourselves, or we could ask the manager to begin sending frequent updates to us. In order to enable that, we’ll create an NSOperationQueue, and then we call the motion manager’s method:
motionManager.startDeviceMotionUpdatesToQueue(motionQueue,
                                 withHandler: gravityUpdated)
This should go in viewDidAppear. In viewWillDisappear, we should call the reversing operation:
motionManager.stopDeviceMotionUpdates()
When the view appears, the system begins regularly calling the gravityUpdated method with new accelerometer data. Let’s implement that method:
    func gravityUpdated(motion: CMDeviceMotion!, error: NSError!) {
        if error {
            NSLog("(error)")
        }
        let grav : CMAcceleration = motion.gravity;
        let x = CGFloat(grav.x);
        let y = CGFloat(grav.y);
        var v = CGVectorMake(x, y);
        gravity.gravityDirection = v;
    }
Let’s talk about that exclamation point. It is tangentially related to the question mark on our declaration of animator. While the question mark indicates that “this variable may be null,” the exclamation point means the opposite: “this variable will never be null.” But it’s actually deeper than that.
When you declare a variable of type animator?, it is not the same type of variable as an animator. You can think of it as a type of object called an Optional, which may or may not contain an animator. Therefore the question mark and exclamation point are acting on the Optional, not on the animator. The question mark means something along the lines of “continue if the object is non-nil,” enabling code like this:
animator?.addBehavior(collider)
You could generate equivalent code by typing this:
if let x = animator { x.addBehavior(collider) }
Or, you can use the exclamation point to ‘unwrap’ the value—in essence, taking the object inside the Optional and passing that value instead of the container. In the gravityUpdated method declaration, we are signifying that we will receive an unwrapped value—it won’t be nil.
Anyway, this is cool and all, but it does not take into account the device’s orientation when reading the accelerometer. As a result, if you turn your phone upside down, it will flip the display but not the accelerometer data, and your boxes will begin acting strangely. So let’s add some code to flip the orientation data as appropriate.
    func gravityUpdated(motion: CMDeviceMotion!, error: NSError!) {
        if error {
            NSLog("(error)")
        }
        let grav : CMAcceleration = motion.gravity;
        let x = CGFloat(grav.x);
        let y = CGFloat(grav.y);
        var p = CGPointMake(x,y)
        // Have to correct for orientation.
        var orientation = UIApplication.sharedApplication().statusBarOrientation;
        if orientation == UIInterfaceOrientation.LandscapeLeft {
            var t = p.x
            p.x = 0 - p.y
            p.y = t
        } else if orientation == UIInterfaceOrientation.LandscapeRight {
            var t = p.x
            p.x = p.y
            p.y = 0 - t
        } else if orientation == UIInterfaceOrientation.PortraitUpsideDown {
            p.x *= -1
            p.y *= -1
        }
        var v = CGVectorMake(p.x, 0 - p.y);
        gravity.gravityDirection = v;
    }
The first thing you notice is that we took the x and y values and created a CGPoint. There’s no particular reason for us to use a CGPoint except that it keeps the values together.
What’s it look like?
Pretty cool!
I took things a little farther by adding two more commits: One adds a UIDynamicItemBehavior, which allows us to modify the friction and elasticity of the boxes. I made them super-bouncy (elasticity = 0.9, friction = 0.1) and then the gravity game rapidly devolved into a manic presentation of boxes bouncing like crazy.
This illustrates one weakness in UIDynamics, however. As the velocity of the boxes increases, eventually they can achieve a speed where the box was fully inside the view on one frame, and fully outside the view on the next frame. In such a case the UICollisionBehavior will not trigger, and the box will disappear. It still exists, and it’s still consuming computational resources, but it will never again reappear in the view. (One imagines the box falling forever, at increasing velocity.)
The next commit adds some UIAttachmentBehaviors to change our 10 boxes into a chain of boxes. It kind of wrecks the playability of the app, but I wanted you to see how these objects can be attached to each other.
Creating this project was pretty fun. Things came together quickly, and since I had written a bunch of similar code in Objective-C, the main focus of this exercise was gaining familiarity with Swift. I feel like I accomplished that—if I had to reimplement any chunk of Objective-C code in Swift, I could probably do it.
On the other hand, I had a hard time getting my boxes to add to the array. In the end, it started working and I didn’t know why (one of the most frustrating feelings in programming), and I chalked it up to semicolons. See, in Swift, semicolons are rarely required, but I’ve been in C-based languages so long that the trailing semicolon is pure habit.
Lastly, I was pleasantly surprised to see that the Swift runtime appears as fast as Objective-C. The behavior of this app seems identical to the behavior of the same app written in Objective-C.
So what are you waiting for? Go build your own! Perhaps next time we’ll use the attachment behavior as a core feature. I’ve always wanted to write a paddle ball simulator…
Our introductory guide to Swift Regex. Learn regular expressions in Swift including RegexBuilder examples and strongly-typed captures.

The Combine framework in Swift is a powerful declarative API for the asynchronous processing of values over time. It takes full advantage of Swift...

SwiftUI has changed a great many things about how developers create applications for iOS, and not just in the way we lay out our...