

Swift Regex Deep Dive
iOS MacOur introductory guide to Swift Regex. Learn regular expressions in Swift including RegexBuilder examples and strongly-typed captures.
Can’t get enough info about iOS 8? Join us for our one-day iOS 8 bootcamps in cities across the U.S.
Apps often need to store their data model objects in the cloud. This may be driven
by the need to share with others, or simply to keep your apps in sync across
multiple devices.
For many app developers, the work required to spin up a web service is too much.
You have to find a place to host the app, write all the server-side code, and only
then can you begin your client-side implementation. There are numerous ways to
accomplish this, but they all require work. And so much of the work would be the
same from project to project.
Apple has released CloudKit to address this need. With CloudKit, Apple has put together
a NoSQL-style storage system. The operating system worries about keeping the iCloud
containers in sync, and it does this in the background. Notification of changes
comes via push notifications—including the ability to background wake your app.
To play with CloudKit, I decided to see how simple it would be to throw together a
chat application. This would function similar to IRC or the old AOL chat rooms.
We won’t spend any time developing the security functions you’d want in an app like
this, but it will show you how to simply create objects in the public database.
My Fatchat app allows you to post messages in channels. When you are looking at a channel
and a new message comes in, it will be added to the window automatically. If you
are not looking at the app and a new message comes in, you will get a push
notification. When you leave a channel, you will stop getting notifications for it.
(Really, a more elegant subscription mechanism should be employed, but I shall
leave that as an exercise for you, dear reader.)
In a given CloudKit record zone, you have record types. These are analogous to
tables in a relational database. CloudKit stores timestamp and user information each
time an object is saved. So when we create our channel, we’re just going to give
it a name.
A channel will contain many message objects, and several subscription objects as
well. You will subscribe to a channel by entering it, and unsubscribe by leaving.
Therefore, we can query those subscriptions to see who is in the channel.
Create a new project!
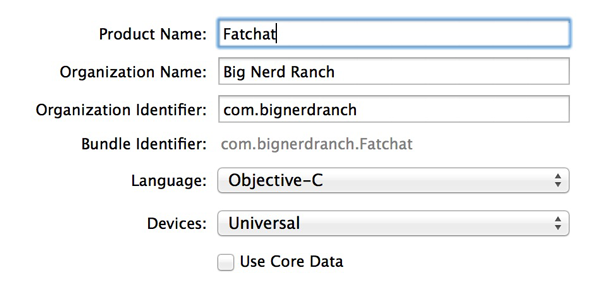
That bundle ID must be globally unique for CloudKit’s use. Once you’ve created the
project, click on the project’s “Capabilities” tab. Enable iCloud and
then check CloudKit.
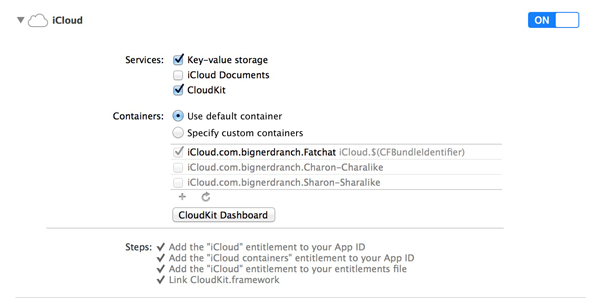
Down below where Steps are listed, you may have some errors. You should also have a
“Fix Issues” button. Clicking that button should make the errors disappear if you are
the admin of your development team.
Leaving aside the development of the UI, let’s jump right into the bits of code that made CloudKit work.
Each CloudKit container has one public database, and a private database for each
iCloud account using the app. Getting a handle to either one is as simple as
calling -publicCloudDatabase or -privateCloudDatabase on the default CKContainer.
In the private database, you can put your data in a Record Zone. Record zones
are an additional layer of organization, analogous to a database schema. The
record zone also offers one important feature: atomic commits of groups of
records, wherein if a single record fails to save, they can all be rolled back.
Public databases do not have the concept of zones. If you query the zones, you will
get back just the _default zone. You can pass in this value as needed, or if you’re
using the _default zone, it is permissible to pass in nil.
    self.publicDB = [[CKContainer defaultContainer] publicCloudDatabase];
    self.publicZone = nil;
    self.handle = [[NSUserDefaults standardUserDefaults] valueForKey:SenderKey];
For completeness, the other part of the handle logic is
- (void)setHandle:(NSString *)handle {
    [[NSUserDefaults standardUserDefaults] setValue:handle forKey:SenderKey];
    _handle = handle;
}
Saving records couldn’t be much simpler. After instantiating a CKRecord object,
you treat it like a dictionary. Once you have added all your values to the object,
you ask the database to save it. There are a couple ways of accomplishing this.
You can create a CKModifyRecordsOperation, which gives you per-record and per-batch
control over the process, or you can call a convenience method on the database.
The convenience method is much simpler, so we’ll use that.
- (void)createNewChannel:(NSString *)channelName completion:(void (^)(BNRChatChannel *, NSError *))completion {
    __block BNRChatChannel *channel = [[BNRChatChannel alloc] init];
    channel.name = channelName;
    CKRecord *record = [[CKRecord alloc] initWithRecordType:ChannelCreateType];
    record[ChannelNameKey] = channelName;
    [self.publicDB saveRecord:record completionHandler:^(CKRecord *savedRecord, NSError *error){
        if(error) {
            NSLog(@"Error: %@", error.localizedDescription);
        }
        channel.recordID = savedRecord.recordID;
        if(!savedRecord) {
            channel = nil;
        } else {
	        channel.recordID = savedRecord.recordID;
        }
        if(completion) {
            completion(channel, error);
        }
    }];
}
The error received should really be handled. In cases where the error is a concurrent
write error, you will receive three records with the error: The failed record, the
conflicting record and the common ancestor of both.
When we create messages or subscriptions, we’ll want to give them a reference
back to the channel. This is a form of foreign key relationship. Because the channel
is the parent and the message is the child, the reference is part of the message.
And if you delete the channel, we should also delete all the messages.
Apple proves a CKReference value type to accomplish that. Here’s one:
    CKReference *channelRef = [[CKReference alloc] initWithRecordID:channel.recordID action:CKReferenceActionDeleteSelf];
    record[ChannelRefKey] = channelRef;
Any large chunk of BLOB data is considered an “asset” in CloudKit parlance. We give CloudKit a reference to the file. It will copy the file into the CloudKit container. After that copy completes, the fileURL property of the CKAsset object will be different. You should never store that value, but rather, access it when needed.
    // Attach an asset if given one.
    if(assetFileUrl) {
        CKAsset *asset = [[CKAsset alloc] initWithFileURL:assetFileUrl];
        [record setObject:@(assetType) forKey:AssetTypeKey];
        [record setObject:asset forKey:AssetKey];
    }
Querying is built on the venerable NSPredicate class. In this example, I ask for
all records. You could add something like name = "Secret Channel" to get as
specific as needed, but for our example, we want anything that matches.
- (void)fetchChannelsWithCompletion:(void (^)(NSArray *, NSError *))completion {
    NSPredicate *predicate = [NSPredicate predicateWithValue:YES];
    CKQuery *query = [[CKQuery alloc] initWithRecordType:ChannelCreateType predicate:predicate];
    [self.publicDB performQuery:query inZoneWithID:self.publicZone.zoneID completionHandler:^(NSArray *results, NSError *error){
        if(error) {
            NSLog(@"Error: %@", error.localizedDescription);
        }
        if(results) {
            NSMutableArray *arr = [[NSMutableArray alloc] initWithCapacity:results.count];
            for(CKRecord *record in results) {
                BNRChatChannel *channel = [[BNRChatChannel alloc] init];
                channel.name = [record objectForKey:ChannelNameKey];
                channel.createdDate = record.creationDate;
                channel.recordID = record.recordID;
                [arr addObject:channel];
            }
            // Sort by created date
            self.channels = [arr sortedArrayUsingComparator:^NSComparisonResult(BNRChatChannel *channel1, BNRChatChannel *channel2){
                return [channel1.createdDate compare:channel2.createdDate];
            }]; // property type `copy`
        }
        completion(self.channels, error);
    }];
}
CloudKit makes extensive use of the Push Notifications system. In order to
begin receiving these notifications, you will create a CKSubscription
that responds to any changes in the zone. The behavior of the notification is
defined in a CKNotificationInfo object.
We start by creating a model notification. This will tell CloudKit what we want
our notifications to look like.
- (CKNotificationInfo *)notificationInfo {
    CKNotificationInfo *note = [[CKNotificationInfo alloc] init];
    note.alertLocalizationKey = @"%@: %@ (in %@)";
    note.alertLocalizationArgs = @[
                                   SenderKey,
                                   MessageTextKey,
                                   ChannelNameKey
                                   ];
    note.shouldBadge = YES;
    note.shouldSendContentAvailable = YES;
    return note;
}
The CKNotificationInfo object is used as a template for the generated
notifications. Each received notification can be turned into a
CKNotification. The CKNotificationInfo object has the following
properties:
alertBody: This will be the alertBody of the received CKNotification.alertLocalizationKey will pull the alert body from the Localizable.stringsalertBody is ignored.alertLocalizationArgs contains an array of keys that will map to an arrayCKNotification. By that I mean, an array of@[ @"firstName", @"lastName" ] would result in a received array of@[ @"John", @"Doe" ]. In the example above you can see how it is used toalertActionLocalizationKey is used to look up the action text from Localizable.strings. If it is nil, there will be only an OK actionalertLaunchImage identifies an image in your bundle to be shown as an alternatesoundName identifies a sound in your bundle to be played with your notification.shouldBadge tells us whether we should increment the app icon’s badge value.shouldSendContentAvailable allows the action to launch the app if it’sNow create a predicate to select your values.
- (void)saveSubscriptionWithIdent:(NSString*)ident options:(CKSubscriptionOptions)options {
    CKSubscription *sub = [[CKSubscription alloc] initWithRecordType:BNRItemRecordType predicate:[NSPredicate predicateWithValue:YES] subscriptionID:ident options:options];
    sub.notificationInfo = [self notificationInfo];
    [self.database saveSubscription:sub completionHandler:nil];
}
- (void)subscribeToItemUpdates {
    NSString *uuid = [[UIDevice currentDevice] identifierForVendor].UUIDString;
    [self saveSubscriptionWithIdent:[uuid stringByAppendingString:@"create"] options:CKSubscriptionOptionsFiresOnRecordCreation];
    [self saveSubscriptionWithIdent:[uuid stringByAppendingString:@"update"] options:CKSubscriptionOptionsFiresOnRecordUpdate];
    [self saveSubscriptionWithIdent:[uuid stringByAppendingString:@"delete"] options:CKSubscriptionOptionsFiresOnRecordDeletion];
}
Once we invoke that method, we will begin receiving notifications whenever objects are added. We named the subscriptions
… and the method where we receive the notification.
- (void)didReceiveNotification:(NSDictionary *)notificationInfo {
    CKQueryNotification *note = [CKQueryNotification notificationFromRemoteNotificationDictionary:notificationInfo];
    if(!note)
        return;
    self.status = BNRItemStoreStatusNotReady;
    [self getItemsFromZone];
}
Finally, in the App Delegate, add a line to -application:didFinishLaunchingWithOptions::
    [application registerForRemoteNotifications];
    return YES;
}
Then implement the notification callback:
- (void)         application:(UIApplication *)application
didReceiveRemoteNotification:(NSDictionary *)userInfo
      fetchCompletionHandler:(void (^)(UIBackgroundFetchResult))completionHandler {
        [self.store didReceiveNotification:userInfo];
        completionHandler(UIBackgroundFetchResultNoData);
    }
}
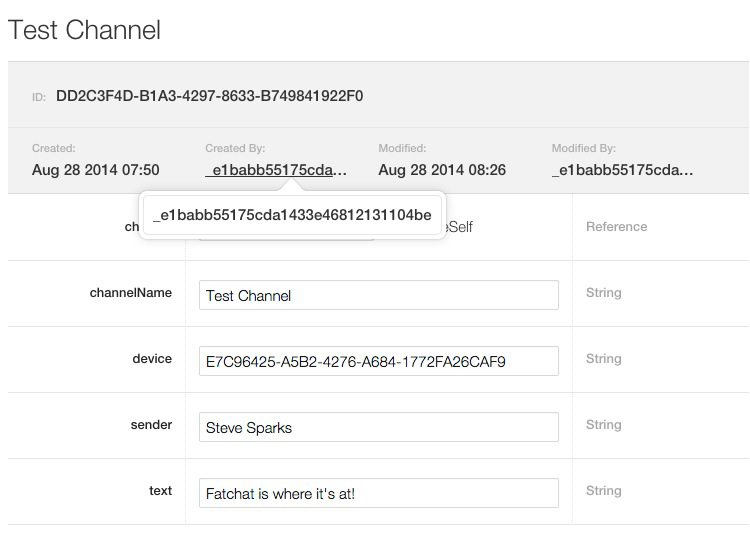
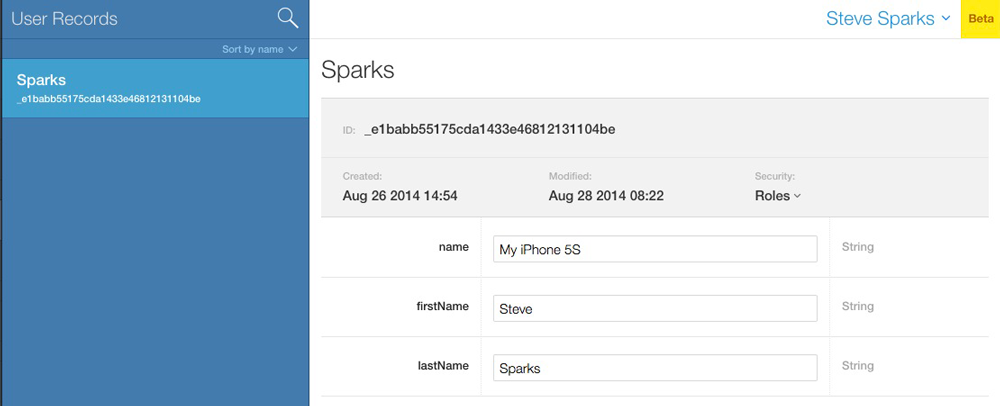
Now that there’s something worth looking at in the dashboard, let’s go click that
button and see our schema.
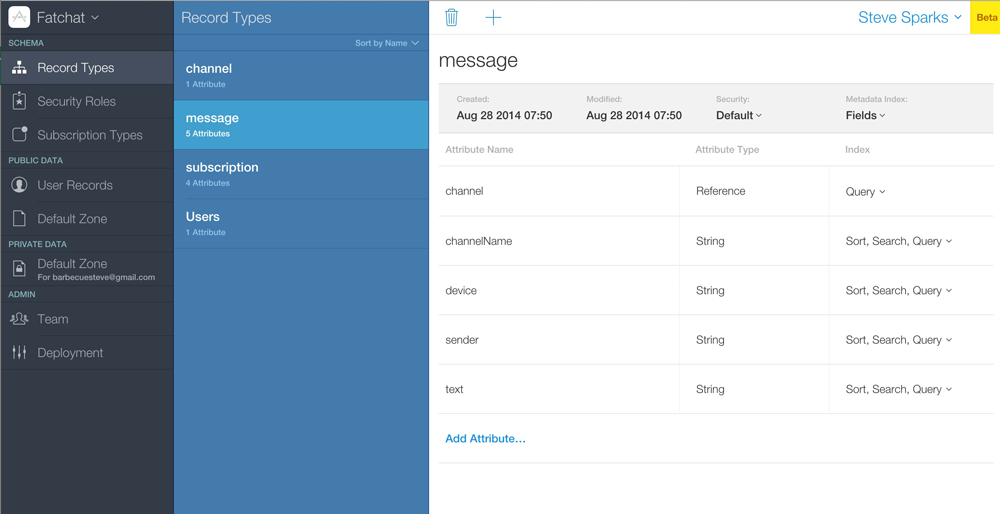
Then look at the public records. Of specific interest: see who created any object.
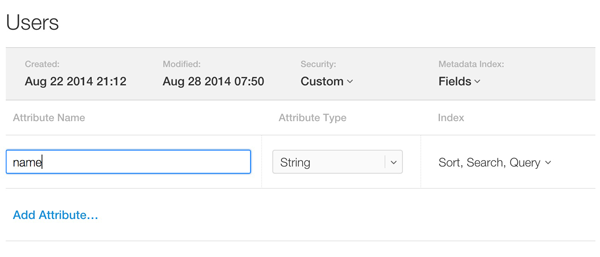
Add a field to the Users schema so you can browse it. I just added “Name” with
the intent of identifying test devices by hand.
And then go browse the data!
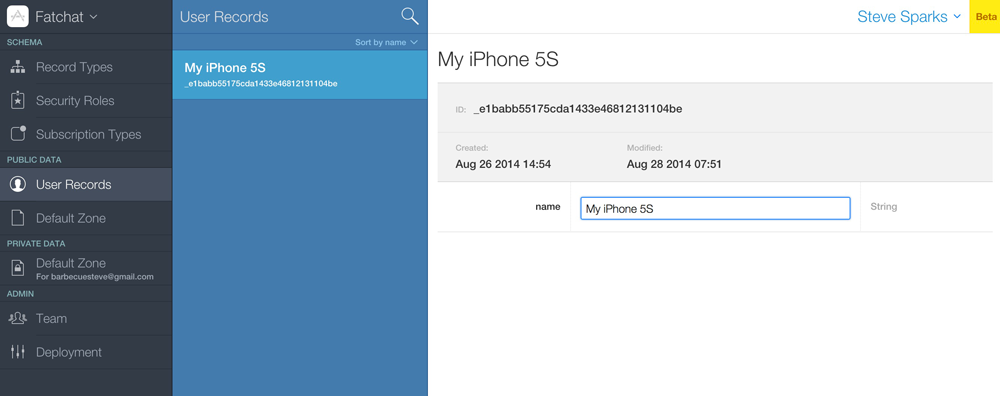
I filled in my info. There’s a “Save” button in the lower right.
But then it occurred to me, huh, maybe I can use the CKDiscoveredUserInfo methods to flesh out that object.
Heading back to where we had originally set up our publicDB property, let’s refactor it a touch to pull out the container and use it again for requesting permission.
CKContainer *container = [CKContainer defaultContainer];
self.publicDB = [container publicCloudDatabase];
self.publicZone = nil;
self.handle = [[NSUserDefaults standardUserDefaults] valueForKey:SenderKey];
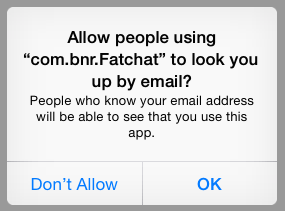
[container requestApplicationPermission:CKApplicationPermissionUserDiscoverability completionHandler:^(CKApplicationPermissionStatus status, NSError *error){
self.permissionStatus = status;
if(self.permissionStatus == CKApplicationPermissionStatusGranted)
[self findMeWithCompletion:nil];
if(error) {
NSLog(@"Error: %@", error.localizedDescription);
}
}];
This creates a popup that looks something like this:
Now let’s write code to discover ourselves, find the associated record ID and
attach the first name and last name to it. A problem is that we cannot discover
ourselves until we’ve created a record. (I’m glad this is software, not a life analogy.)
- (CKDiscoveredUserInfo *)findMeWithCompletion:(void(^)(CKDiscoveredUserInfo*info, NSError *error))completion {
    if(!self.me) {
        CKContainer *container = [CKContainer defaultContainer];
        void(^fetchedMyRecord)(CKRecord *record, NSError *error) = ^(CKRecord *userRecord, NSError *error) {
            LOG_ERROR(@"fetching my own record");
            self.myRecord = userRecord;
            userRecord[@"firstName"] = self.me.firstName;
            userRecord[@"lastName"] = self.me.lastName;
            [self.publicDB saveRecord:userRecord completionHandler:^(CKRecord *record, NSError *error){
                LOG_ERROR(@"attaching my values");
                NSLog(@"Saved record ID %@", record.recordID);
            }];
        };
        void (^discovered)(NSArray *, NSError *) = ^(NSArray *userInfo, NSError *error) {
            LOG_ERROR(@"discovering users");
            CKDiscoveredUserInfo *me = [userInfo firstObject];
            self.myRecordId = me.userRecordID;
            if(me) {
                NSLog(@"Me = %@ %@ %@", me.firstName, me.lastName, me.userRecordID.debugDescription);
                [self.publicDB fetchRecordWithID:self.myRecordId completionHandler:fetchedMyRecord];
            }
            self.me = me;
            // If someone wanted a callback, here's how they get it.
            if(completion) {
                completion(me, error);
            }
        };
        if(self.permissionStatus == CKApplicationPermissionStatusGranted) {
            [container discoverAllContactUserInfosWithCompletionHandler:discovered];
        } else {
            if(completion) {
                completion(self.me, nil);
            }
        }
    } else {
        if(completion) {
            completion(self.me, nil);
        }
    }
    return self.me;
}
After running it, my info was populated in the Dashboard. To see it, I had to refresh
the entire web page; the schema appears to be cached in the browser.
CloudKit was an incredibly fast way for me to set up shared relational data
across many devices. The performance was decent, too; replication of Fatchat
messages typically took only a second or two. Those two things lead me to see
a lot of promise in this API.
But there are thorns on these roses, too. It’s iCloud-only, of course, which
means Apple-only, without a simple migration plan if you branch
out. And the storage tiers may not fit your usage: The website seems to
indicate that it’s free until you surpass a million users, but a
closer look indicates that exceeding the individual limits may also impose
a cost. And those limits aren’t as generous as at first they appear, if you
decide to store rich media in your app. Finally, and most importantly, the privacy model at the moment is “you” or “everybody”—CloudKit doesn’t yet contain a
mechanism for securely sharing an item with someone else.
If these limitations are okay with you (and for several of my apps, they’re
fine), then CloudKit may well be your fastest route to implementing the
auto-synchronizing app you’ve been working on.
Our introductory guide to Swift Regex. Learn regular expressions in Swift including RegexBuilder examples and strongly-typed captures.
The Combine framework in Swift is a powerful declarative API for the asynchronous processing of values over time. It takes full advantage of Swift...
SwiftUI has changed a great many things about how developers create applications for iOS, and not just in the way we lay out our...