My App Design Setup

In Kitchen Confidential, Anthony Bourdain harps on the importance of a proper mise-en-place, or setup, for line cooks in a bustling kitchen:
The universe is in order when your station is set up the way you like it: you know where to find everything with your eyes closed, everything you need during the course of the shift is at the ready at arm’s reach, your defenses are deployed… If you let your mise-en-place run down, get dirty and disorganized, you’ll quickly find yourself spinning in place and calling for backup.
While the physical urgency in a professional kitchen is probably higher than most tech offices, the right setup for an interface designer can be the difference between hours of creative flow and hours of fruitless frustration. Everyone’s ideal app design setup is unique, but here is what’s currently working for me.
Vertical Arrangement
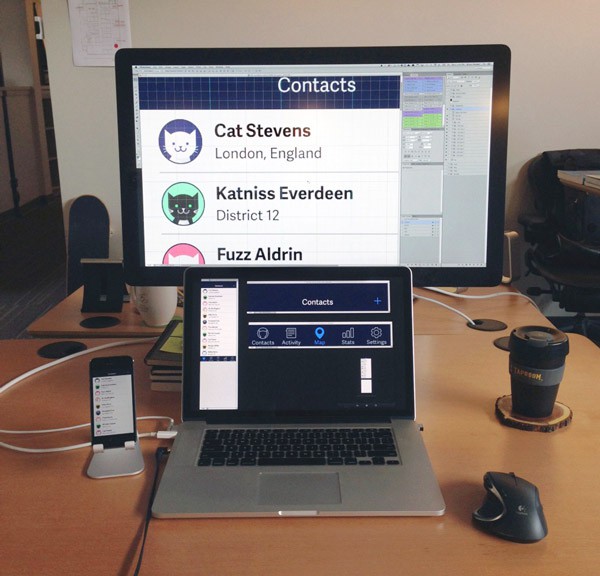
I have a laptop and external monitor at my desk. I seem to be in the minority at the office, but I arrange them vertically instead of side-by-side. I like it because there’s minimal separation between the two displays, the arrangement is symmetrical and I don’t need an external keyboard. As an added bonus, I can make believe that I’m using a giant Nintendo DS for work.
Clean Desktop
There are some beautiful wallpapers out there. Some of them are tasteful and subtle, but even those are a distraction for me. The temptation to cycle wallpapers or search for the next best thing is too much. Now I just set my background to a solid dark blue and be done with it.
Desktop icons can also pile up easily as I save files. I tend to manually file them away when they start taking over the desktop, but if you’re looking for a more elegant solution, I hear that Hazel can take care of these things.
Photoshop
Even though it wasn’t made exclusively for digital interface designers, Photoshop is my design tool of choice. Its vector shape tools are fast enough to let you sketch quickly, and they’re powerful enough that you can layer on high-fidelity visual design later. Illustrator and Sketch are also popular among designers at Big Nerd Ranch, and many of these concepts can be translated to those tools as well.
Shortcuts
Keyboard shortcuts are like having tools inside your fingertips. Yes, like Inspector Gadget. The shortcuts I frequently use include:
-
alt(option)+drag copies whatever you have selected. That can be a single layer or multiple layer groups on either the canvas or the Layers panel. It’s like copy/paste in one motion, with the added bonus of giving you control over where the copy will land. For more precision, try alt(option)+arrow keys to nudge copies.
-
right-click to select a layer. This basically summons the Layers panel to the canvas and shows you just the layers and groups present at the pixel you right-clicked on.
-
command+= & command+- to zoom in and out. Done in quick succession, this will resize a window to show the full canvas.
-
command+` to cycle focus through windows or tabs. Most of the time, I use this to remind myself how many windows I have open and to close (command+w) what I don’t need.
Actions and Workflows
Photoshop Actions and Automator Workflows are the food processors and KitchenAid mixers of the app design world, automating common multi-step tasks for you.
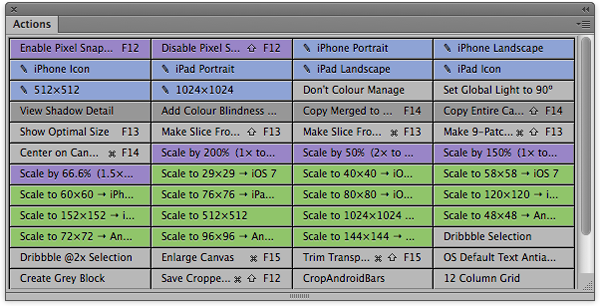
(The Actions Panel in Button Mode)
The patron saint of app design, Bjango’s Marc Edwards, shares and maintains his set of Photoshop Actions and Workflows. These cover most of the things you’ll reach for on a daily basis if you’re designing apps. If you want to create your own Actions, recording new ones from the Actions panel is simple enough. And if you assign hotkeys for Actions, you can even activate them from an iPad with the Actions app.
Automator Workflows are like Actions for Mac OS X. You can create workflows using Automator.app’s visual scripting interface. If you’re creating iOS assets, using Bjango’s Automator Workflows for batch adding or removing “@2x” from filenames is a huge timesaver.
Multiple Contexts
Opening the same PSD in multiple windows can show you multiple perspectives of one document at the same time. It’s like Cubism for the 21st century. Try it by clicking Window > Arrange > New Window for *.psd. You can have one window zoomed in at 3200% with a grid overlay, plus another window at 100% with no grids or guides. This isn’t Picasso-level stuff, but this setup allows you to work at the pixel level and see the whole composition simultaneously.

(This is not a glitch in the Matrix.)
The first time you see your design on an actual device shouldn’t be after the developer sends out a build. If you have the phone or tablet you’re designing for, I recommend using a tool like Bjango’s Skala Preview. This can beam your active Photoshop window to an iPhone or Android device in real-time. Testing mockups in context answers important questions like, “Is 9pt type actually readable?”
Layer Comps
If you’re like me and cram lots of screens into a single PSD, Layer Comps help organize those screens and keep your file size low. Be aware that if they’re not created and updated properly, Layer Comps have the potential to wreak havoc on your PSD. To avoid that, I use Layer Comps only to toggle the visibility of different layers. It’s tempting to user Layer Comps to move layers around and apply different Layer Styles, but that’s too much for me to keep track of without all hell breaking loose. Just make new instances of layers to manage different positions and appearances, and rely on Layer Comps to remember which layers to show/hide.
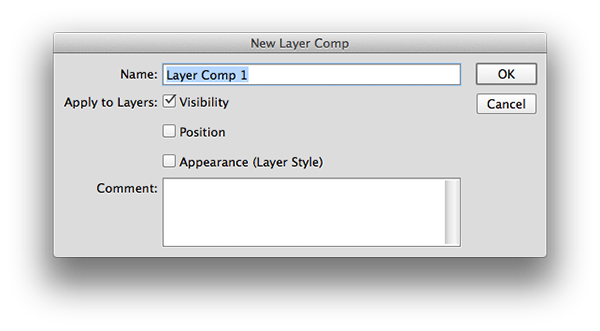
(For sanity’s sake, don’t check Position or Appearance.)
When it comes to exporting Layer Comps, Photoshop ships with a script that will export all of a PSD’s Layer Comps at once. You can find it under File > Scripts > Layer Comps to Files.
Linked Smart Objects
If you’re designing an app, there are probably elements that you want to show up on multiple screens (navigation bars, tab bars, icons, etc.). If you edit a common element on one screen, wouldn’t it be great if you didn’t have to edit it everywhere else? Linked Smart Objects can help with that! Coupled with Layer Comps, Generator and sprite sheets, Linked Smart Objects can really streamline comp design and image asset exports.
Ready, Set up, Go!
Using the right setup makes app design a whole lot easier and more efficient. In my next post, I’ll dive into using Linked Smart Objects, Generator and Dropbox to create and iterate on Flinto prototypes. Cats will be involved.